
There’s nothing worse than rushing around trying to get everything done before you get in the saddle. I’ve been there too many times to count! Over the years, I’ve learned a few tricks that shave some time off my prep – or at the very least, save me from getting a few new gray hairs from stress.
Jod Keepers
These elastic and velcro straps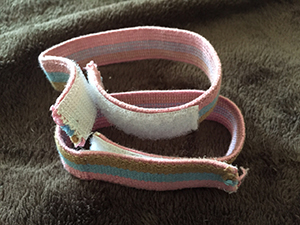 are really handy for keeping my show jods off the ground once I get dressed. I keep a set in each pair of my show boots, and an extra set in my Caboodle just in case. But the bigger tip is DON’T TAKE THEM OFF. When you get in the saddle, just slide them down around your ankle before you pull your jods down. That way, they’ll be there when you get off and you won’t be scrambling around trying to find them or tiptoeing your way back to your stall, hoping you don’t step on your jods.
Tail Switch
You can’t put a tail switch in too early, or you risk causing damage to the tailbone. But usually right about the time when you’d put in the switch is when you also need to do a million other things. What if you could put the switch in hours – or even a day – ahead? You can!
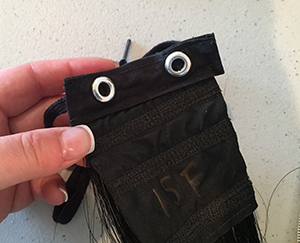 “But how?” you ask? Easy! Add two small grommets to the top of the switch, and then braid it into the tail instead of tying it in. The photo at the right shows the underside of my switch. I sewed a 1″ strip of heavy cotton behind the section where the string traditionally runs, so the switch can still be tied in if desired. Click the image to enlarge.
- Step 1. After washing and drying the tail, part the hair horizontally at the level you want the tail switch to be added, about 3-4″ above the end of the tailbone.
- Step 2. Create 3 skinny braids – one on each side of the tail, and one on the underside of the tailbone. All 3 should be small enough to fit through the grommet and should start at the part you made. Make them about 6″ long. There is no need to band or tie them at the ends.
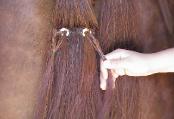 Step 3. Lay the switch in position, and pull one side braid through each grommet (see photo).
- Step 4. Pull the side braids to the back of the tail and braid them together with the third braid. This final braid should be about 4″ long. Band or tie this off at the end.
Putting in the switch this way is super easy to do yourself, too. Just use a big hair claw to hold the feathers out of your way, and you can temporarily tie the switch in place while you braid it all together.
Mane Braid
Putting in a mane braid is one of those things that’s hard to do alone. I’ve tried using a leg wrap around my horse’s neck with a cooler clamp holding the ribbon, but it just doesn’t work very well. A better idea is to braid the ribbon in advance and rubberband it in. You can buy mane rubberbands from stores that carry hunter/jumper equipment. I use a band that matches my horse’s mane instead of one that matches the ribbon so it’s harder to see.
Do you have any other time or stress saving tips for our readers? Please share them in the comments below!

- Fixing the One-Sided Horse - March 28, 2016
- Running Martingales, Draw Reins and German Martingales – A Physics Lesson - November 23, 2015
- What to Do in the Off Season - October 14, 2015
As I get to be an AOT at a few shows a year, I’ve learned these things to make my life easier.
1 – Clean your tack at home. Then it just needs a wipe down at the show and you are ready to go. Seems obvious, but …
2 – All of my clothes are organized in different bags. Bags are tagged outside with what they have, so all I have to do is grab a bag and I have my whole outfit. I get garment bags from Schneider’s (about $20 ea) so ties, matching magnets, etc. are all in the outside pocket. Gloves stay in the hat box with the matching hat as some of my hats are used with multiple outfits.
3 – Feed is organized in baggies for the number of days that it will be needed. Then, I dump all the baggies in the feed bucket. Easy to carry, easy to organize and no schlepping extra baggies.
4 – when I bring my own feed in an extra stall in the horse trailer, I have a cheapo cart from Harbor freight. Hay is loaded on it, secured, and then just rolls right off the trailer and can be parked in my feed stall or in front of my stalls as necessary.
5 – organize, organize, organize. Wash items are in a bucket for ease of carrying. All hoof items are together. Obviously, a groom box. All electrical items (cords, power strips, lights) are in a box together. And I can’t emphasize enough the importance of hanging racks – for clothes, for tack, for whatever – Those are kept in the trailer and come out first thing so as to make my prep stall easy.